
Master how to use dial caliper for Perfect Measurements
Coachful
The part is in your hand. The caliper is on the bench. You close the jaws, glance at the dial, and suddenly a simple job feels technical enough to make you second-guess yourself.
That reaction is normal.
A dial caliper looks more complicated than it really is. The dial has tiny marks. The beam has its own scale. There are different jaws, a depth rod, a lock screw, and enough polished metal to make a beginner worry about damaging the tool or reading it wrong. Users don't struggle because they're careless. They struggle because nobody showed them the rhythm.
That rhythm matters when you're learning how to use dial caliper the right way. Reading the number is only part of it. The bigger skill is learning how the tool should feel in your hand, how the jaws should sit on the part, and how to tell when a measurement is trustworthy instead of just convenient.
If your readings keep changing, you're not alone. Beginners often get one value, check again, and get another. That usually comes down to pressure, angle, dirt, or jaw position, not bad eyesight or bad luck. Once you know what to look for, the tool gets much less intimidating.
From Intimidation to Precision in Minutes
The first mental shift is this. A dial caliper isn't a mystery tool. It's a measuring tool with a sequence.
You don't read everything at once. You don't guess. You don't squeeze and hope. You move in order, and you let the tool tell you the answer.
Most new users are nervous about two things. First, they don't trust the number they see. Second, they don't trust their own hands. They worry they're holding the caliper wrong, pressing too hard, or missing some hidden trick that experienced machinists just know.
There is a trick, but it isn't secret. It's consistency.
What good technique feels like
A correct measurement usually feels calm, not forced. The jaws contact the part without snapping shut on it. The caliper sits square instead of twisted. Your hand guides the tool instead of wrestling with it.
When that happens, the number stops drifting around.
You're not trying to overpower the caliper. You're trying to let it settle into the part.
That's why experienced people can measure quickly without looking rushed. They're not relying on speed. They're relying on repeatable hand placement and a routine they trust.
What you need to believe before you start
Keep these three ideas in mind:
- The tool is precise, but it isn't magic: Good readings come from clean contact, correct alignment, and controlled pressure.
- A repeatable reading matters more than a fast reading: If the number changes every time, slow down and fix the technique first.
- You can learn this quickly: The caliper was built to be used on real shop work, not admired from a toolbox.
By the time you've measured a bolt shank, the inside of a pipe, the depth of a hole, and a small step on a machined surface, the tool will make a lot more sense in your hand than it does sitting on the bench.
Decoding the Dial Caliper Anatomy and Scale
A dial caliper gets a lot less intimidating once you know which surface is doing the measuring and which scale is giving you the number. Before you check a part, learn the pieces well enough that your eyes know where to go and your hands know what square contact feels like.
The large lower jaws measure outside dimensions. The smaller upper jaws measure inside dimensions. The rod that slides out of the end measures depth. The stepped faces on the back measure step distance. The beam carries the main scale, and the dial shows the fine movement that would be hard to read by eye on the beam alone.
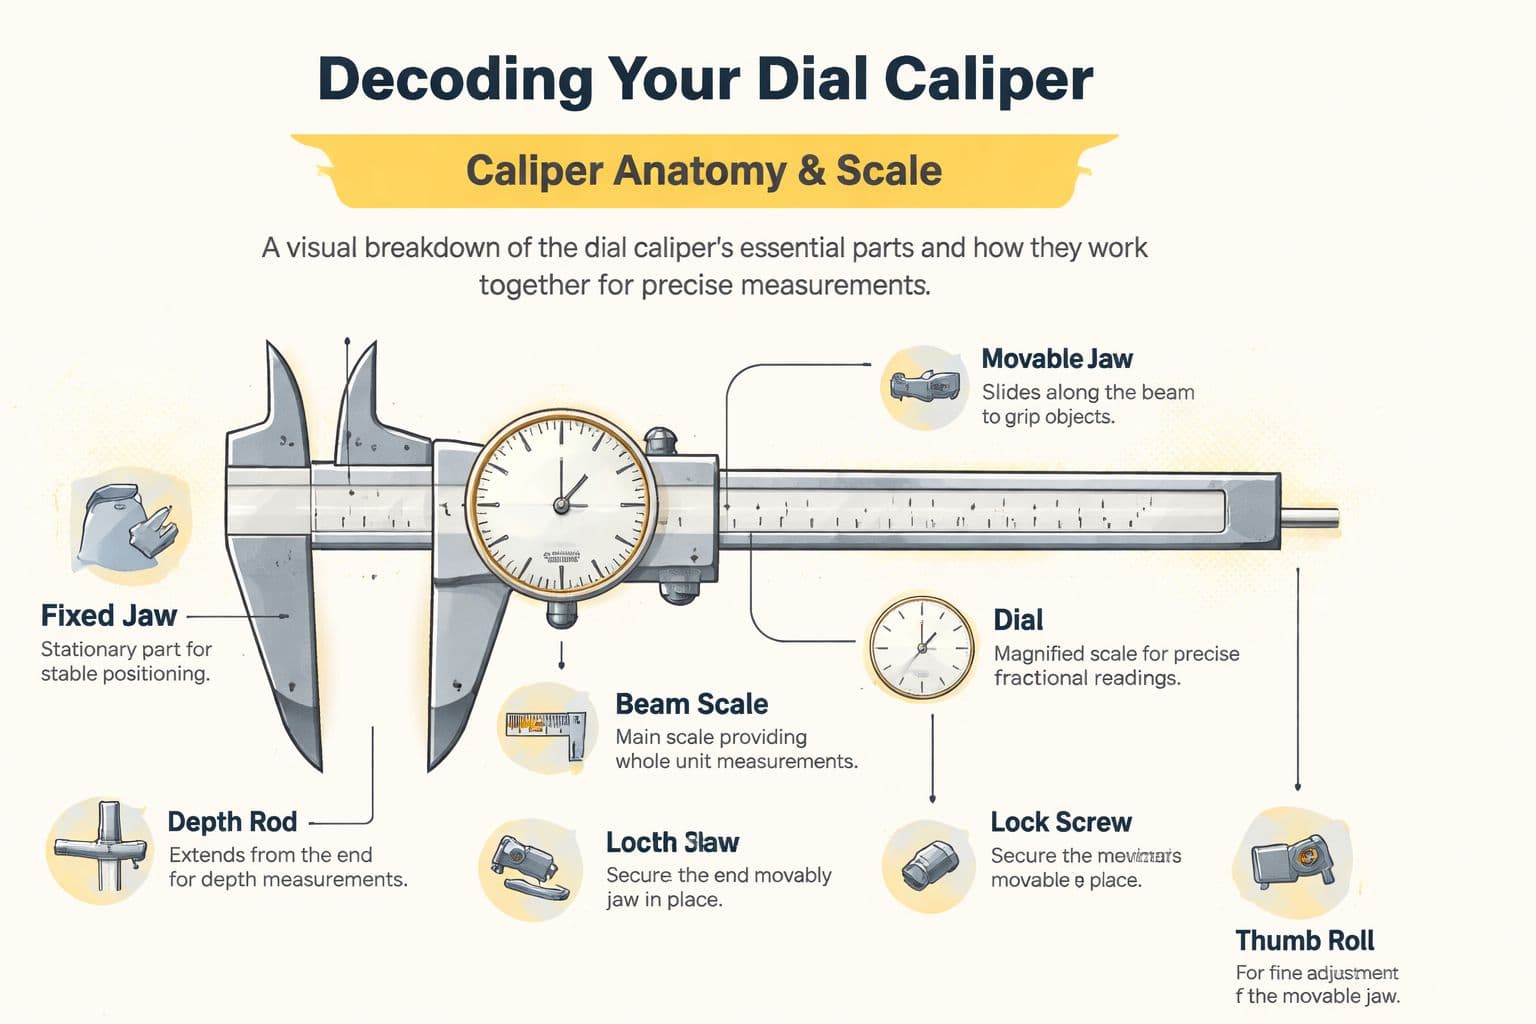
Know what each part is doing
Beginners usually miss one of two things. They either use the right part in the wrong position, or they read the scales out of order.
Here's what each part contributes:
| Part | What it does | What beginners get wrong |
|---|---|---|
| Fixed jaw | Gives you the stationary reference | They let it sit crooked against the part |
| Movable jaw | Closes onto the part | They push it into contact instead of easing it in |
| Beam scale | Shows the larger portion of the reading | They ignore it and look only at the dial |
| Dial | Shows the fine reading | They try to read it before establishing the beam value |
| Depth rod | Measures hole or slot depth | They let the caliper base rock or tilt |
| Lock screw | Holds a reading when you need to carry it elsewhere | They crank it down too hard and shift the slider |
| Thumb roll | Gives controlled movement | They shove the slide by hand and lose feel |
That last point matters more than it seems. The thumb roll helps you creep up on contact instead of snapping into it. That is a big part of getting the same reading twice.
Read the measurement in order
Read a dial caliper the same way every time. Start with the beam, then finish with the dial.
According to Travers Tool's explanation of dial caliper reading, the reading is built on a four-step scale system. Read the whole inches on the main beam first. Then read the tenths and the additional beam increments. Last, add the dial value. The dial has 100 divisions, one full revolution equals 0.100 inch, and each small line equals 0.001 inch.
That sounds fussy on paper. In your hand, it becomes a routine.
A simple example you can follow
Say the caliper reads 1.234 inches.
Build that number in order:
- 1.000 inch from the whole-inch mark
- 0.200 inch from the beam
- 0.030 inch from the beam progression
- 0.004 inch from the dial
Add them together and you get 1.234 inches.
Read the beam first, then the dial. Apprentices who reverse that order usually lose track of where the main scale stopped, especially when the pointer is sitting near a numbered mark on the dial.
The dial face is there to speed up the fine part of the reading, not replace the beam. The numbered marks help you orient yourself quickly so you do not have to count every tick one by one.
A shop tip that saves confusion
If you are checking tubing, fittings, or anything pipe-related, compare your caliper reading against known industrial pipe dimensions. Pipe naming does not always match the actual outside diameter, and beginners often blame the caliper when the actual issue is the standard they are comparing against.
What not to do
Do not glance at the needle and fill in the rest from memory. Read what the tool shows.
Do not skip the beam because the dial feels easier. The beam gives the foundation of the measurement. The dial only refines it.
And do not rush past the feel of the tool. If the jaws are square, the slider moves under control, and the reading is taken in the same order every time, the scale starts to make sense fast.
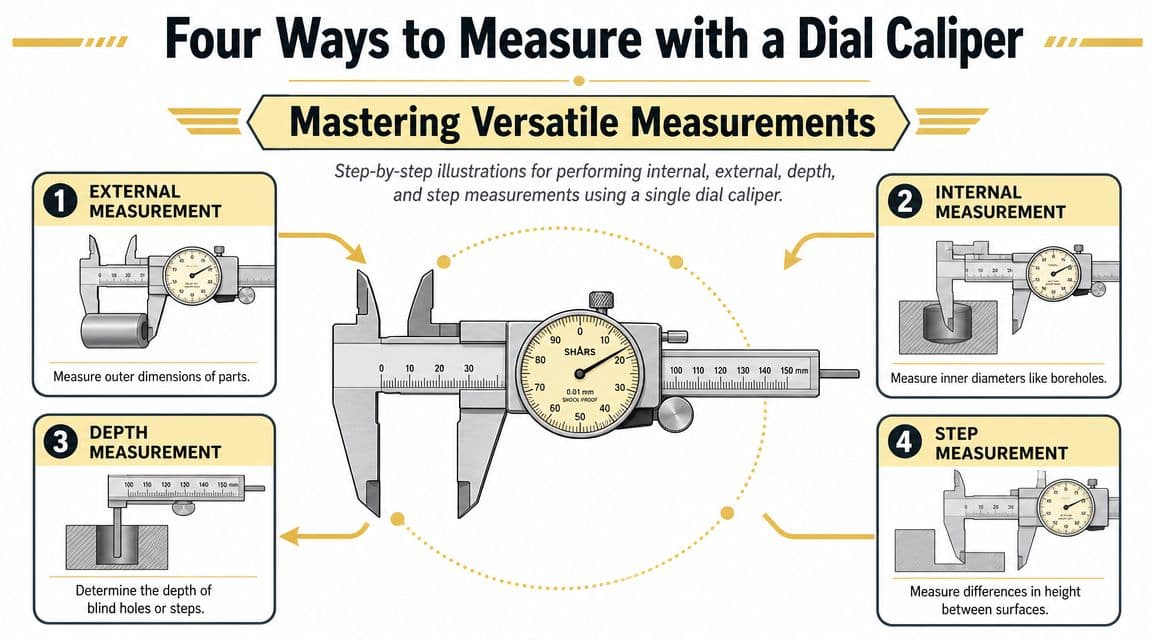
Mastering the Four Fundamental Measurements
A dial caliper earns its place in the shop because one tool handles several common jobs. A University of Notre Dame lab guide on dial calipers identifies four common geometries it can measure: outside diameter or thickness, inside diameter or width, step distance, and hole depth.
That versatility matters in real work. You can move from checking a bolt, to a bore, to a drilled hole, to a shoulder on a machined part without changing tools.
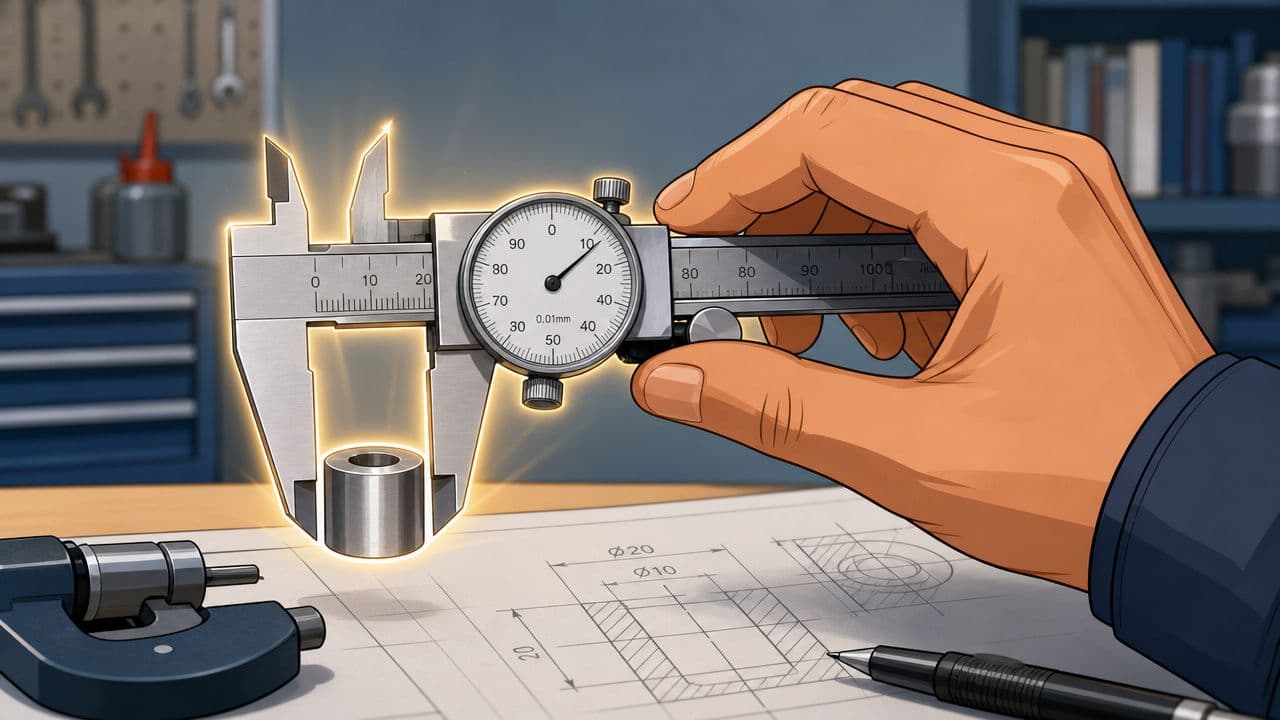
Outside measurement on a bolt or shaft
Start with something simple like the shank of a bolt.
Open the outside jaws a little wider than the part. Bring the jaws onto the bolt gently and keep the tool square to the diameter. If the caliper is tilted, you can get a false reading because the jaws aren't contacting the true width.
The feel you want is light contact with control. Not loose. Not clamped down.
If you're checking tubing or pipe-related parts, it also helps to understand nominal sizes versus actual measured dimensions. A quick reference to industrial pipe dimensions can save you from confusing a name size with a caliper reading on the actual part.
Inside measurement on a pipe or bore
Inside measurements are where beginners usually lose confidence.
Use the smaller upper jaws. Open them inside the hole or opening, then gently expand until both contacts touch. Now use a slight rocking motion to find the true internal span. If you stop at the first contact point, you may not be at the widest point.
That rocking motion is not sloppiness. It's how you let the tool settle into the actual inside dimension.
When an inside reading feels uncertain, the answer is usually to slow down and let the jaws find the maximum span.
A bore in a bracket is a good practice piece because you can repeat the measurement several times and watch how the reading stabilizes as your hand improves.
Here's a visual walkthrough if you want to watch the motions on actual parts:
Depth measurement in a drilled hole
Now use the depth rod. Set the end of the caliper flat on the top surface of the part and extend the rod into the hole.
The mistake here is almost always tilt. If the base of the caliper doesn't sit flat, the rod won't give you a true depth. Let the body of the caliper rest evenly on the reference surface before extending the rod.
A blind hole in a block is a good training example. Run the rod down until it touches bottom, but don't jab it. You're looking for contact, not force.
Step measurement on a shoulder or recess
Step measurement is the one many people overlook, even though it solves common shop problems.
Use the stepped measuring faces on the back side of the caliper. Place the fixed reference edge on the lower surface, then slide the movable jaw until it contacts the upper surface. This works well for checking a recess, shoulder, or lip where one surface sits above another.
The important part is sequence. Set the fixed side first. Then bring the moving side into contact. If you try to land both at once, you'll often shift the tool and lose the true reference.
Which job suits a dial caliper best
Use this quick guide when you're deciding whether the dial caliper is the right tool:
- Outside checks: Good for bolts, shafts, plate thickness, and general part sizing
- Inside checks: Good for bores, slots, and openings when you use the slight rocking method
- Depth checks: Good for drilled holes and recesses if the base sits flat
- Step checks: Good for shoulders, lips, and ledges where two surfaces sit at different heights
If the work demands a more specialized approach, experienced machinists often switch tools rather than forcing the caliper to do a job it isn't best at. That judgment is part of learning the craft.
How to Guarantee Consistent and Accurate Results
Most bad caliper readings don't come from not knowing how to read the dial. They come from poor contact.
That's why two people can use the same tool on the same part and get different answers. One person seats the jaws properly. The other cocks the tool, squeezes too hard, or measures over dirt. The dial reports whatever the jaws are doing.
Start with zero and clean contact
Before any serious measuring, close the jaws and verify zero. If the jaws are closed and the dial isn't at zero, fix that first.
Also wipe the contact faces on the caliper and the part. A chip, burr, or film of grime can distort the reading before you ever look at the dial.
Pressure has to be controlled
Guidance from Cooper Johnson's dial caliper use guide on Instructables is straightforward. For accurate results, the jaws must be seated squarely with controlled force. Outside measurements need gentle but firm pressure, inside measurements may need a slight rocking motion to find the true span, and burrs, dirt, or cocked jaws can significantly distort the reading.
That lines up with what you feel in practice. Good pressure is enough to establish contact without flexing the part or the tool. If you hear the jaws snap shut or see the needle jump because you forced it, back off and do it again.
Square beats fast
If the caliper is not square to the workpiece, the number may look precise but still be wrong.
Use your eyes before you trust your hand. Look at the jaws from the front and side. Are they sitting flat on the feature you're checking? Is the beam aligned with the part, or is the tool twisted slightly?
A quick check routine helps:
- Zero first: Close the jaws and confirm the dial returns properly
- Clean both surfaces: Wipe jaws and part before contact
- Seat the tool squarely: Don't accept a twisted or tilted position
- Use one consistent touch: Gentle, firm contact beats squeezing
- Repeat once: If the second reading disagrees, diagnose before recording
A repeatable measurement is usually the honest one. If the reading changes, the setup changed too.
Beginners achieve reliability. Not when they memorize the dial, but when they build a hand motion they can repeat without thinking.
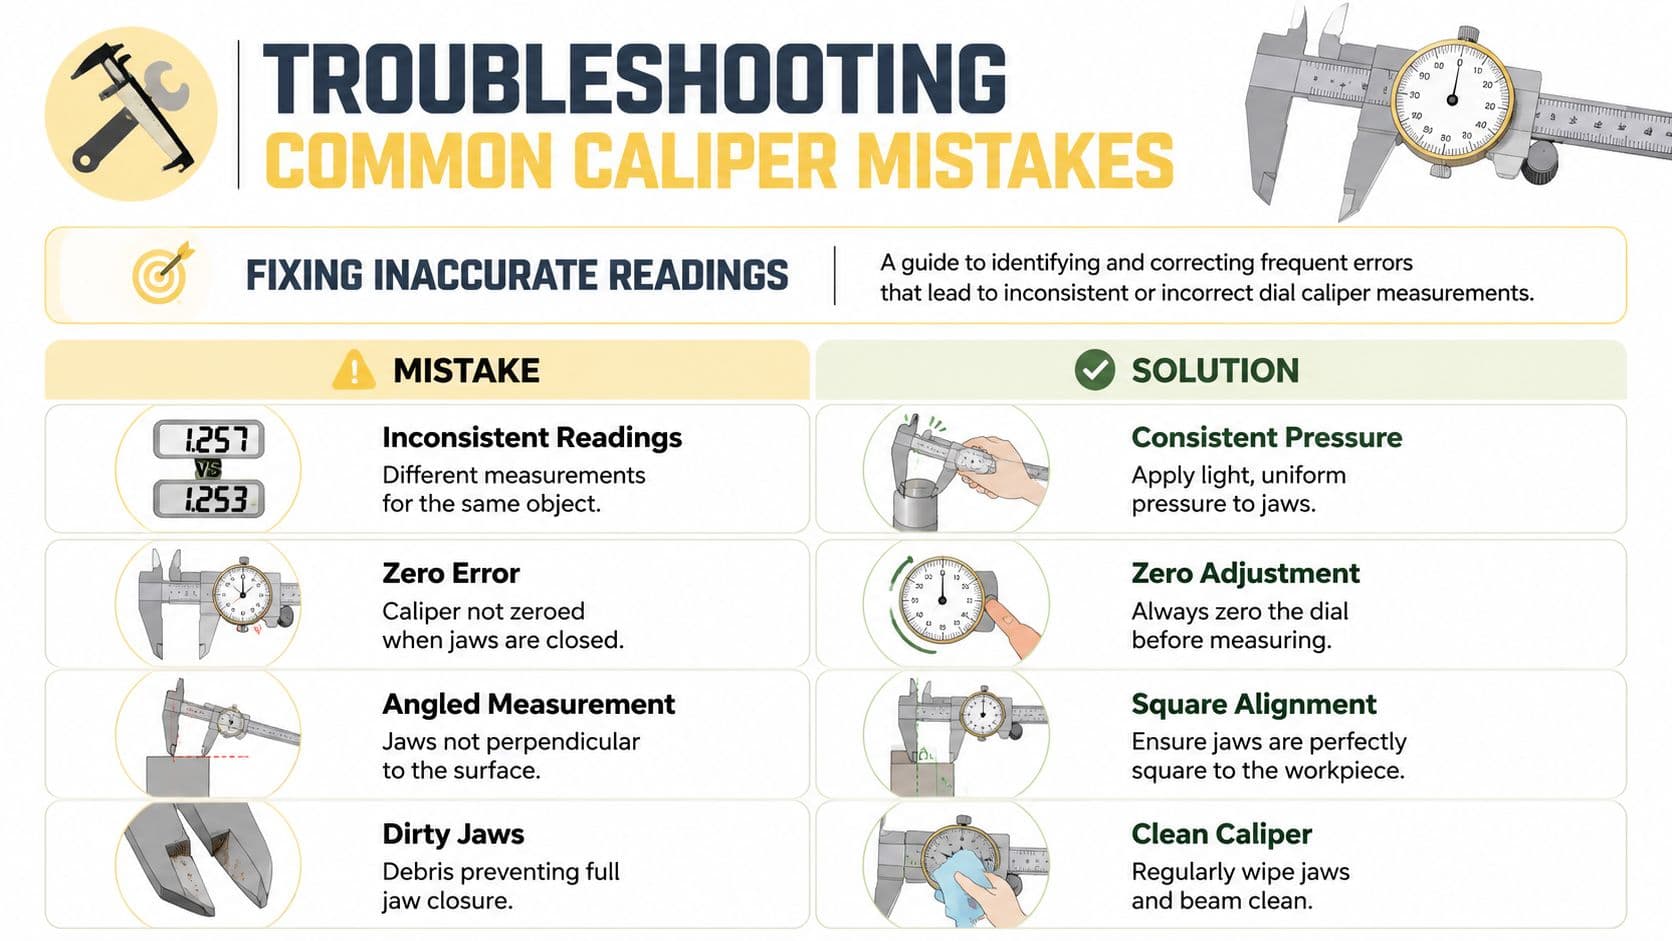
Troubleshooting Common Caliper Mistakes
You measure a part once. Then again. The numbers don't match.
That doesn't mean the caliper is bad. Most of the time, it means something changed between one measurement and the next. The good news is that the usual mistakes are easy to spot once you know the patterns.
If the reading changes every time
This is the classic beginner complaint.
In advanced beginner guidance discussed in this video on dial caliper inconsistency and error control, measurement error grows when the tool is dirty, held at an angle, or used with too much pressure. Those are the first three things to check when the same part seems to have multiple sizes.
Use this table like a shop-floor checklist:
| Problem you see | Likely cause | What to do |
|---|---|---|
| Reading changes on the same outside diameter | Pressure changes from one attempt to the next | Use the same light closing force every time |
| Inside dimension seems too small | Jaws didn't reach the true span | Rock slightly until the reading peaks |
| Depth reading drifts | Base isn't flat on the reference surface | Reset the caliper so the body sits flat |
| Step reading looks odd | One edge lost contact with its surface | Re-establish the fixed reference first |
If the dial looks right but the number is wrong
Sometimes the tool gives a clean reading, but it still isn't trustworthy.
That usually comes from one of these:
- The caliper wasn't zeroed: Always check zero before a measuring session
- The jaws are dirty: Even a tiny chip changes contact
- The tool is cocked: An angled caliper does not measure the true feature
- The part has burrs: You may be measuring debris, not metal
Read the dial straight-on as well. If you glance from an angle, your eye can misread the needle position.
Don't fight inconsistency by choosing the reading you like best. Fix the setup until the tool gives the same answer twice.
A simple recovery routine
When a measurement doesn't make sense, use this sequence:
- Remove the caliper from the part
- Close the jaws and check zero
- Wipe the jaws and the workpiece
- Re-seat the tool squarely
- Measure again with lighter, controlled contact
That routine solves most beginner problems. It also gives you a method you can repeat under pressure instead of relying on instinct.
Mistakes with a dial caliper are normal. Uncorrected habits are the core problem. Once you know how to diagnose the bad reading, the tool becomes far less frustrating.
Proper Care and Storage for Lasting Accuracy
A dial caliper keeps its accuracy longer when you treat it like a measuring instrument, not like another hand tool that can live under a pile of wrenches.
Good care is simple. Clean it, put it away properly, and pay attention to small changes in how it feels. A caliper usually warns you before it fails. The slider starts feeling gritty. The dial stops returning the same way. The jaws pick up a nick. Catch those early and you avoid chasing bad measurements later.
The daily routine that protects the tool
After each use, wipe the jaws, beam, rack, and sliding surfaces. Remove chips, dried coolant, fingerprints, and oil film. A tiny bit of debris on the measuring faces can change a reading. Grit on the beam also changes the feel of the slide, and that matters when you are trying to repeat a measurement the same way twice.
Close the jaws with a light touch. Watch the needle return to zero. Do not snap the jaws shut to "test" it. That habit wears the contact faces and shocks the mechanism for no benefit.
Use this routine:
- Wipe after every use: Clean the contact faces and sliding surfaces before debris hardens or gets dragged into the rack
- Store in the case: Keep it out of drawers full of punches, pliers, and other steel tools
- Close it gently: Light contact protects the jaws and the dial mechanism
- Check zero often: A quick check tells you whether the tool is still behaving normally
- Keep it dry: Moisture, sweat, and coolant residue lead to rust and rough movement
If the slide suddenly feels different, stop and inspect it before the next job. Rough movement changes your touch, and your touch changes the reading.
Storage matters more than people think
A lot of calipers get hurt while sitting still.
Loose storage is hard on the tool. The jaw tips get bumped. The dial face gets cracked. Grit settles on the beam. Even if the caliper still looks fine, it may stop giving the same reading from one try to the next. Put it back in its case after use, especially in a busy shop where tools get moved around all day.
Respect for a measuring tool shows up in how you put it away.
Store it clean and dry, with the jaws just closed, not clamped tight. If the case has room for the caliper to rattle around, fix that with a cleaner case or better placement. Precision tools should not bounce around in transport.
Know when to switch tools
A dial caliper earns its place because it can handle outside, inside, depth, and step measurements with one tool. That convenience comes with a trade-off. It is fast and versatile, but it is not the best choice for every tight-tolerance job.
As noted in this discussion of dial caliper versatility and tool choice, dial calipers are excellent for general measurement work, but a micrometer or depth mic will usually be the better pick when the tolerance gets tighter and the setup allows it. Good tool choice is part of accuracy. So is honesty about what your caliper can do repeatably in your hands.
That is the benchmark. You are not just reading numbers. You are using the tool with enough care and feel to trust the result.